How to Make Tanjirou Earrings for Decoration?

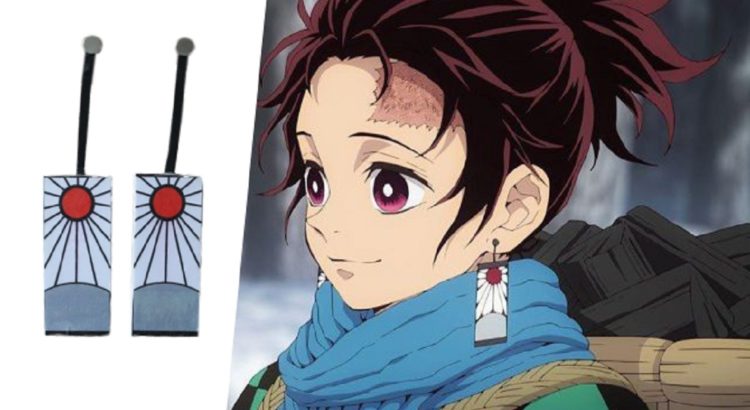
Like many animation fans, I am deeply fascinated by the Demon Slayer: Kimetsu no Yaiba. As one of the protagonists of this manga series, Tanjirou Kamado is very popular among the audience for his kind and brave personality.

In addition to the standard Demon Slayer costume, he wears a pair of hanafuda earrings inherited from his father. Many people like this pair of Tanjirou earrings very much and want to make a pair of such decorations.

Read More

How to Make Rose Quartz Cosplay Crystal Gem

Rose_QuartzPNG_NewsHiya everyone! I’m sorry I haven’t posted in awhile >.< forgive me please? School has been a lot these past few weeks, but that should be no excuse! However, now I have everything settled and I can do more for all of you 😀 yaaaaaay! Anyways, today I’m going to do a tutorial on ‘Rose Quartz‘ star gem from Steven Universe. If many of you do not know ‘Rose Quartz’ She is the mother of the main character Steven in the show ‘Steven Universe’ and also the former leader of the Crystal Gems who protect earth and other worlds from evil and corruption. If you haven’t watched the show Steven Universe I highly ,( and I emphasize highly) recommend watching it and also exploring many of the other Crystal gems that are great for Cosplaying! I chose Rose Quartz because when she was first introduced  I was immediately captivated by her beauty and I love her background story on how she came to earth and how it led to Steven being who he is today 🙂

Now, before we can get started here is what you’ll need!:

  • Heat Gun
  • Craft Foam (Red, Yellow, Pink if you choose to not paint)
  • Paper
  • Marker
  • Hot glue Gun
  • Paint ( Preferably red, yellow and pink)
  • Scissor or Exacto Knife
  • Some type of solid wood/Plastic area (This is for when you use the heat gun)
  • Mod Podge
  • Paint Brushes

Read More

Sword Art Online – Silica’s Chest Plate Tutorial

sword-art-online-ep4-1-590x331

This is a step by step explanation of how I made my chest plate for the character Silica from the anime Sword Art Online. I used this method was an experimentation I did with Fimo air clay, it has worked really well and I’m here to share my process. There are many other ways to make amour such as using foam, wonderflex etc. but I find that foam tends to crinkle after a while and wonderflex is too pricy. However this method only works well if you have a mannequin that you can adjust the size to fit your measurements.

So what you need:

  • An adjustable dress mannequin and set it to your size
  • Fimo Air light clay. I used 2.5 packets for the front piece for a small build person and I suggest using 3-4 for larger built.
  • Cling wrap
  • Tougher plastic such as a large plastic bag
  • Rolling pin
  • Water spray
  • Container of water
  • Permanent marker
  • Utility knife
  • Sanding paper
  • Spray paint
  • Acrylic paint in a similar colour to the chest plate
  • A gloss or varnish. If not pva glue mixed with some water will work fine
  • Heaps of patience

The clay that I use is:

FIMO Air Light Packaging

STEPS:

  1. Wrap up your mannequin with cling wrap.
  2. Draw on the shape you want for the chest plate onto the plastic with the permanent marker.
  3. Cover a smooth flat surface such as a table or floor with cling wrap. Try to limit the amount of creases as possible as they will show up later.
  4. Open up the desired amount of packets you wish to use and try to mixed them all together first.
  5. Lay it out onto the covered area and try to flatten it is much as you can. This will make it easier for you later.
  6. Place the tougher plastic bag over the clay and use the rolling pin to flatten the clay into a rectangle strip that is slightly larger than the desired size of the chest plate.
  7. Remove the plastic bag and pick up the rolled clay with the bottom cling wrap.
  8. Place the clay facing down onto the dress mannequin so now the cling wrap should be facing towards you.
  9. Adjust the clay and mould it to the body.
  10. Try to remove as much excess clay as possible as it will help you later on. You can also use a water spray to help smooth over the surface with your hands.
  11. When you are happy with the shape and size, remove the plastic and let it dry for 24-48 hrs.
  12. After the time period has pasted gently remove the clay from the mannequin and let it dry on the inside for the same amount of time. Your chest plate should now be dry.20131127_112255
  13. Draw onto the chest plate the right shape with a marker and use a utility knife to cut off the excess. If you make a big mistake you can fix up the area by adding more clay and try to smooth it out as much as possible, let it dry and repeat the cutting process.20131127_115447
  14. Now onto the details. Use the marker and draw on the details you wish to add that come out from the chest plate.
  15. With the addition of the details keep a water spray and container nearby to help you smooth the surface. Pinch off large pieces of clay and roll it into a cylinder. Add these to the edges of your chest plate . Press it down and smooth it out as much as possible. If it does not stick dip the clay into water.20131127_123650
  16. Let it dry completely.
  17.  Once your chest plate is dry, use sanding paper to smooth over the surface.
  18. Now use a gloss or varnish to cover your whole piece. If you don’t have that PVA glue mixed with water will work as well. Let it dry.
  19. Paint the inside of the chest paint with a colour similar to the outside. Or if your clay is already that colour that is fine to leave it as it is.
  20. Finally use spray paint to coat the outside of the chest plate.silica


How to Make Fake Wounds For Cosplay-Scars And Scratches

EMBED THE IMAGE Above ON YOUR SITE

Sometimes cosplayers need to make fake wounds which look alike being a war or fights with others, especial when they plan to cosplay zombies or other horribe animes. So today , i will share you some tips to How to Make Fake Wounds or Scars And Scratches For Cosplay , this is a really nice cosplay makeup tutorial, and you can use this simple methord to make any fake wounds you like ,XD .

Required materials: red ink, scouring pad, white glues, toothpicks (thin patterns are okay) and cotton swabs.

1.Draw the wound scope by white glues.

Read More

Cosplay Tutorial-How To Make Macross Frontier Sheryl Nome’s Microphone

Macross Frontier Sheryl Nome cosplay is really popular, we have blog Sheryl Nome cosplay twice in our blog, you can check it  here and here . Besides Sheryl Nome’s cosplay costumes,maybe you are looking for ideas or tutorials to make the wireless microphone for Sheryl Nome.Just check the original photo below :

Then check the inforgraphic below for tutorials details :

EMBED THE IMAGE Above ON YOUR SITE

Additional resources about making Sheryl Nome’s mic: