Weekly Fanart Feature #6 *Special* – Cosplay: The Series

For the rest of December we will be having special Fan Art Features! The works below are entries from COSPLAY: The Series Fanart Competition.

COSPLAY: The Series is a live action cosplay web series airing every Wednesday on YouTube. Right now they are having a fanart competition of which Mic Costumes will be sponsoring free costumes for the winners. You can also win DVDs, magazines, a plush doll, a T-shirt, and more awesome prizes. Join before December 31st! Details on http://is.gd/ctsfancomp

Rizky Ilhamsyah (Indonesia)- Ink and Photoshop
248954_159028524163890_123095181090558_323285_2378625_n

Radheya Budiman (Indonesia)- Photoshop
299459_201584646574944_123095181090558_449310_1371138515_n

Dame Neko (Indonesia)- Photoshop
390138_215683928498349_123095181090558_489715_104124460_n

Lydia Rosette (Singapore)- pencil and watercolor
383285_215685038498238_123095181090558_489716_1053978909_n

To have the chance for your works to be featured here please email us at miccostumesfanart [@] gmail.com with the following:

  • Your Name
  • Country.
  • Website [if desired]
  • Medium of work i.e. Pencil, Paint, Photoshop etc.
  • A maximum of 2 works attached in the email
  • The name of the anime/manga/video game it is from

Weekly Fan Art Feature #5 – Vocaloid and Kingdom Hearts

This week’s fan art feature showcases the works of two artists.

The first artist goes by the name of Astrid, they live in Indonesia and currently posts their works on devianart. The works below are both done with Paint Tool SAI.

Kingdom Hearts Birth By Sleep – Ven, Aqua, Terra and Vanitas

chibi KH heads

Vocaloid – Rin Kagamine
adult rin

The second artist today is an artist from the US who goes by the name of Azeran from deviantart. The work below is titled Madness Beyond the Late. The work is of Hatsune Miku from Vocaloid and it was done in pencil and charcoal.

Vocaloid – Hatsune Miku

100_1934

To have the chance for your works to be featured here please email us at miccostumesfanart [@] gmail.com with the following:

  • Your Name
  • Country.
  • Website [if desired]
  • Medium of work i.e. Pencil, Paint, Photoshop etc.
  • A maximum of 2 works attached in the email
  • The name of the anime/manga/video game it is from

Weekly Fan Art Feature #4 – Vocaloid and Kingdom Hearts

It’s my pleasure today to showcase the works of three amazing artists for our weekly fanart feature.
..
The 1st artist, Jennifer from the US recreated the iconic wayfinders from Kingdom Hearts Birth By Sleep. The work is done using plastic casting. Visit Jennifer’s Deviantart page for more awesome stuff.
..
Kingdom Hearts Birth By Sleep – Wayfinders

P1013446

..
The second artist today is Kumiko44 from Hungary. Their works are digitally created using Easy Paint tool SAI and they showcase their works through Deviantart. The work featured today is of Kagamine Rin and Len from Vocaloid.
..
Vocaloid – Kagamine Rin and Len

halloween_RL_smallres

..
The last fanart feature for this week  is done by Tricia. Tricia’s from the US and used mixed media for her work below. The medium of the work consists of pencil and photoshop. Visit their deviantart page for more beautiful works.
..
Vocaloid Story of Evil – Servant of Evil Kagamine Len

___servant_of_evil____by_tricia_chan-d348xtd

To have the chance for your works to be featured here please email us at miccostumesfanart [@] gmail.com with the following:

  • Your Name
  • Country.
  • Website [if desired]
  • Medium of work i.e. Pencil, Paint, Photoshop etc.
  • A maximum of 2 works attached in the email
  • The name of the anime/manga/video game it is from

Weekly Fan Art Feature #3 – D.Gray-man and Pokemon

For our Fan Art Feature this week, we showcase to you the works of two very talented artists both from the United States of America.

The 1st artist today goes by the name of Kiley, their work is of Allen Walker from the anime/manga/video game D.Gray-man. The work is done using mixed media including pencil, pastels, markers etc. For more of Kiley’s works please visit  their deviantart page

D.Gray-man – Allen Walker
Allen Walker Fanart

The second artist for today’s feature is Alex Smith, from Philadelphia, USA.  Alex’s works are digitally created using Adobe Photoshop. The works below are of the Pokemon Lickitung, Vanillish and Charmander. For more of Alex’s works visit their facebook page

Pokemon – Lickitung, Vanillish

so_tasty_by_miya_kome-d3bv7er

Pokemon – Charmander

do_you_feel___do_you_know_by_miya_kome-d3cq24e

To have the chance for your works to be featured here please email us at miccostumesfanart [@] gmail.com with the following:

  • Your Name
  • Country.
  • Website [if desired]
  • Medium of work i.e. Pencil, Paint, Photoshop etc.
  • A maximum of 2 works attached in the email
  • The name of the anime/manga/video game it is from

How to make Tsubasa Chronicle’s Sakura Headband

11111sakura

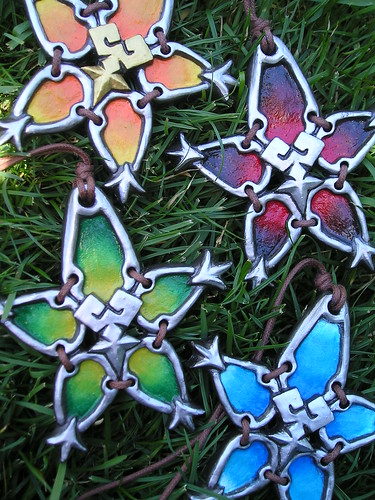
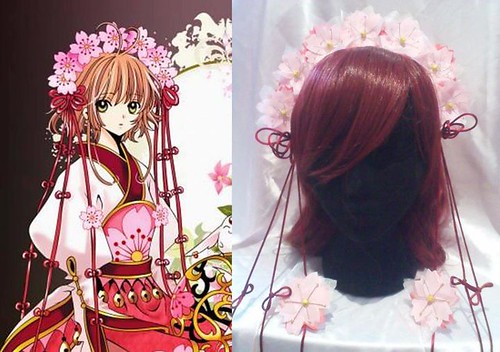
I’ve always loved CLAMP’s works, especially Cardcaptor Sakura and Tsubasa reservoir chronicle so today I’ve made this tutorial will show you how to recreate Sakura’s headband as shown above^^ Check out my Deviantart page for more cosplay accessories.

What You Need:

  • A4 Pink foam sheets x3
  • Pink cotton fabric
  • Pink organza fabric – this is like a see through fabric, it’s a bit rough and keeps it’s shape rather than chiffon.
  • Yellow Beads
  • Silver/Gold flat head pin findings – these are usually used to make earrings
  • Silver/Gold crimps – they look like small beads and are made from metal.
  • Small Gold/Yellow beads
  • Hot Glue
  • 10 metres of thin red rope
  • Large Gold beads that can fit though the rope.
  • Headband
  • Stanley Knife
  • Hand sewing needle
  • Pink/white thread
  • Pliers
  • You will also need to download this template

Steps:

  1. Download the template and cut it out.  Draw this template out onto the foam sheets. You will need 18 flowers.
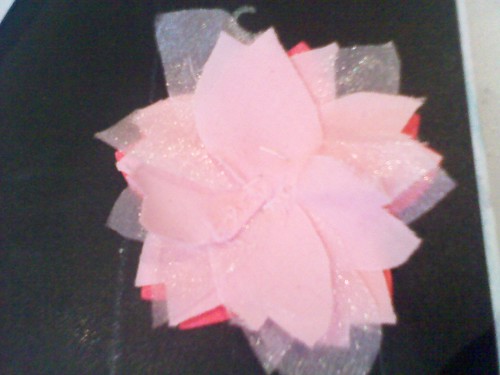
  2. Cut out a lot of  sakura petals from the 2 types of fabric. They don’t have to be perfect, just roughly cut them out.
  3. Grab one foam flower, place the petals onto the foam in a circular motion, swapping between cotton and organza fabric.
  4. After completing one round of petals, sew this down with the sewing needle and thread. Make sure all the petals are sewed down.
  5. Make another round of petals and sew it down again.
  6. Repeat steps 3, 4 and 5. You will need 9 flowers in total.

P111008001 
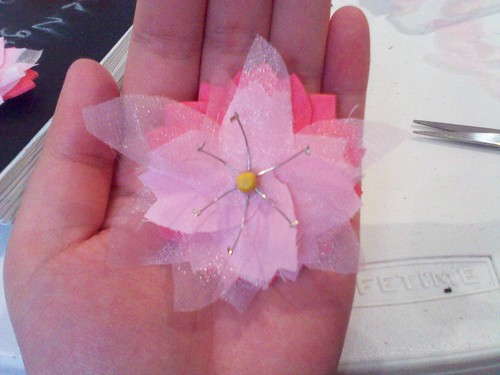
7. Get your flat head findings and thread though the small gold/yellow bead. Get a crimp, thread this through and using the pliers squish down the crimp. this will stop the bead from moving. You will need to make 54 of these.

8. Put a little ball of hotglue onto the middle of the flower. Place 6 of your findings onto this. Make sure they are evenly spread out.

9. Using hotglue, glue a yellow bead in the middle of the flower to cover the findings. Repeat for all 9 flowers.

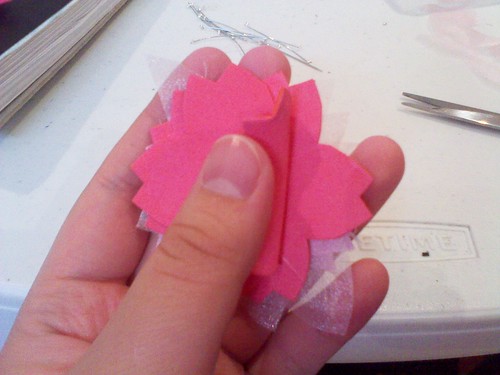
10. Grab an unused foam flower, place this on the back of a flower you just made. Don’t put it under the flower directly, make the petals for both flowers show.

P111008002

11. IMPORTANT! Hot glue the two flowers together only 2/3 way. Make sure you have 1/3 still unglued! Repeat for a total of 7 flowers. Leave the other 2 flowers aside.

P111008003

12. Grab your headband and find the middle. Get one of your flowers and fold open the unglued part. Now put a thick strip of  hot glue onto the middle of the headband and place the flower directly above it. Make sure the flower stands up straight.

13. Glue the remaining 6 flowers onto the headband, working from the middle down.

14. Cut your red rope into 8 lengths. 6x 1.5 metres and 2x 1 metre

15.  Grab the 1metre rope and wrap this around your 4 fingers 4 times. Pull it off and with the ends of the rope, tie 2 knots to secure the bow. Repeat for the other rope. Cut off excess.

16. With your 6 red ropes, tie little bows along it, make sure the bows are all at the same places. IMPORTANT leave out 2 ropes. These two ropes can have the same bows along it but skip one for the top. Our flowers will go in this spot.

17. Grab 3 of the 1.5m ropes and hot glue them together right under the flower on the head band. Make sure the ropes with the missing bows goes at the front. Do the same for the other side.

18. Glue down the bows you just made on top of the 3 ropes.

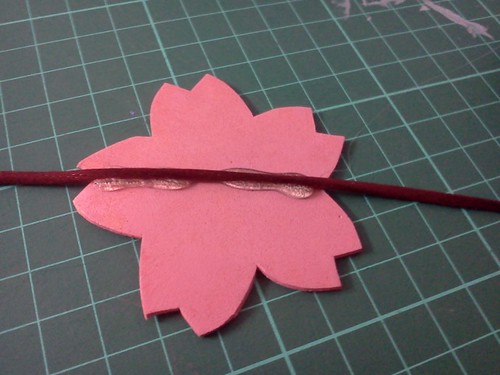
19. Where we left a gap for the front ropes, sandwich together the flower, rope and unused flower. Glue with hot glue.

IMG20111009_003

20. Thread though the bottom of ropes 5 of the larger gold beads and knot the end. Repeat for all 6 ropes.

21. Optional: If you want you can curve the metal findings instead of leaving it straight. To curve it use your pliers.

sakura