Pleats Tutorial for Madam Red from Kuroshitsuji

A little over a year ago I was asked about how I did Madam Red’s pleats, so I created a quick, six picture tutorial with explanations. Now I will share it here. If there are any questions, feel free to contact me and I will clarify or get more info to you.

Step 1: The Start

1

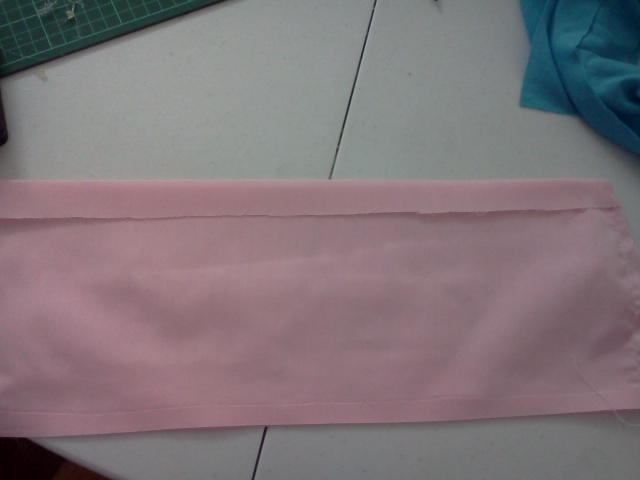
First you will want to cut all your fabric that will be pleated. Since it will take so much fabric, you will want to go ahead and also stitch together all the lengths that you will need to make each part. It is up to your discretion how tall each pleat should be, but remember to factor in both the seam allowance at the top and the hem at the bottom. I always fold my hem in twice to encase the raw edge and then stitch it down before I start. Once all that is done, get a measuring gauge or ruler, or something that is the width you want for the pleats. I chose to make them all 1″ pleats, so each pleat actually takes 3″ of fabric. So that will create the math for each piece. Say the circumference of the bottom of your skirt is about 72″ around. You will then need to do a little math: 72×3=225″ is the total amount you need for pleats. But again, remember seams. You will want to leave enough at the start and end of the strip you cut to put the seam together once you finish all the pleating. Does all this make sense?
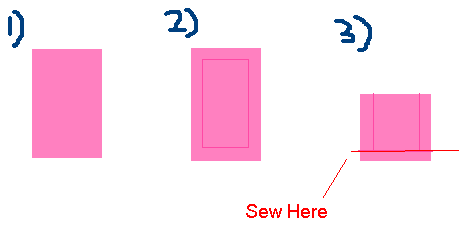
Step 2: First Fold

2

Okay, so once you have set down whatever you are using to gauge your pleat width, fold back the fabric at the edge. Don’t fold back all of it if you are using a really long piece, as it will take you forever. You can complete this step and the next one all together, but I did them separately in this picture just for the sake of explanation.

Step 3: Fold Back

3

Just fold the fabric back at the edge of the pleat and you are ready for the next step.

Step 4: Iron

4

That’s the logical next step right? Just hold down the folds and place a good, hot iron right on it. I use steam when I iron in pleats too, just for extra reinforcement.

Step 5: On to the next one!

5

After getting the first pleat ironed down, move your gauge or ruler or whatever you are using to measure right next to the edge of the first pleat and start the process over again…and again and again and again. It’s sorta like lather, rinse, repeat. Trust me, it will take a while. I think I logged 6 hours of cutting, hemming, pleating and stitching for this one costume and there’s about 20 yards of fabric that got turned into pleats.

Step 6: Finished Pleats

6

Don’t mind the fact that I didn’t get the last pleat completed. I just cut a long strip of fabric without measuring. I always pin each pleat into place once it’s pressed to keep it from getting out of control and unfolding while I work on the piece. Each of my pieces was so long I had to drape them over a chair as I moved them off the ironing board.

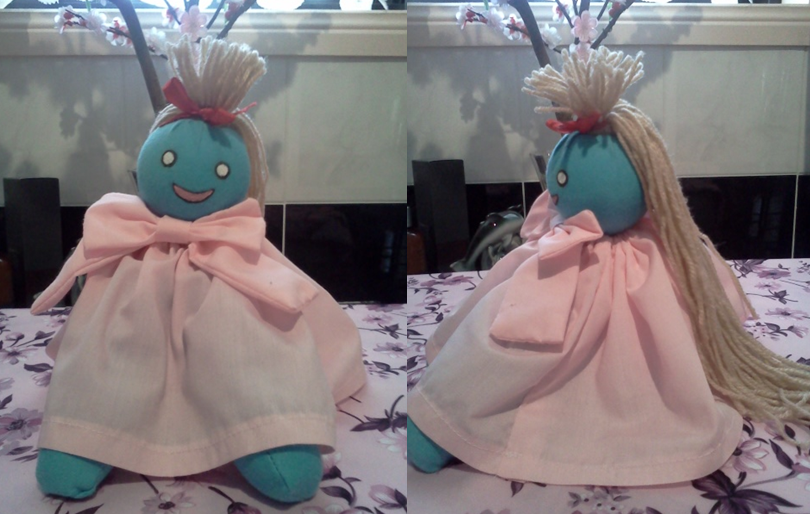
Finished Cosplay Front:

7

Finished Cosplay Back:

8

More images can be found in these galleries: here and here and here

A little side note about the trio of Kuroshitsuji cosplay that my Madam Red costume was a part of: we won a Best Craftsmanship Award in A-kon’s Friday Hall Cosplay Contest at A-kon 21 in 2010.

If you have any questions about any of the costumes in this trio, please, feel free to ask.

Shippuden Haruno Sakura Tutorial

Over the last number of years, I’ve been asked about how I made my best friend’s Sakura costume. We made the costume for her back in 2006 when Shippuden was first starting in the manga and had to figure out a number of things. The main thing was the zipper and skirt. And I’ve created a tutorial for anyone who is curious about the process. I was happy to have been invited to write a guest post and this was one of the first things that came to mind to share since I’ve been asked about it so much for the last five years. If something needs clarifying, I will do my best to help. Also, I might add the boots to this some time since I get asked about those too. For now, on to the tutorial.

Step 1: Complete your shirt

Shippuden Haruno Sakura Tutorial

Just follow the directions for whatever pattern you use to make the basic shirt, omitting any kind of closures it may tell you to put in. And then step back and look at this poor, unassuming little shirt. It doesn’t realize it’s about to be split right down the middle!

Step 2: Zipper Placement

Shippuden Haruno Sakura Tutorial

Time for the work. So you will want to get a separating zipper, and one a little longer because you have to compensate for the curve. Now, lay it out on the shirt where you want to have it in the finished product. Pin it directly to the shirt as you get it where you want it. You will have to clip the zipper tape to get the curve, so just take the tip of your scissors and clip it to just before you hit the teeth.

Step 3: Sketching the Line

3

After you have your zipper where you want it, slowly pull the pins, holding down the zipper with one hand. As you pull the zipper away from the shirt, take chalk or a light colored pencil and trace where the teeth of the zipper meet. This is where you will be cutting in the next step.

Step 4: Here comes the scary part!

4

After the zipper is completely away from the shirt and the line is visible, take a deep breath and cut the sucker right down the line. It’s scary to cut up all that hard work, I know. But trust me, it’s not that bad.

Step 5: Pinning the Zipper

5

Once everything is all cut out, separate the two sides of your zipper and begin to pin them in. You will want to turn under the shirt fabric just a bit to hide the raw edges. And if you need to do so, clip a bit of the fabric to make it easier to turn, and it’s much smoother looking on the front too.

Step 6: Stitching down the zipper

6

Stitch the zipper down using a zipper foot. It will make life much easier, trust me.

Step 7: The Zipper’s Done!

7

And that’s how it should look^^

Step 8: Tools

8

Here’s the secret to my circles. I use Heat N Bond on the back of white cotton fabric and then draw the circles with a cd tower and the top from a ready-made cake icing container. Woo…the secret is out!

Step 9: Placement

9

Center the circle wherever you choose for it to sit. Make sure you are happy with it where it is before you iron.

Step 10: Pressing

10

I just follow the directions on the Heat N Bond. Press with no steam with a damp pressing cloth for about ten seconds. Just read the directions on whatever you use and you will be fine.

Step 11: Voila!

11
We have a circle!

Step 12: Materials

12

So here is what I used for the skirt. I already cut out the front and back pieces. Cut two pieces each for the front and back. This will hide all raw edges and give you a nice smooth skirt. The back is slightly wider than the front. Also shown are the zippers, buckles, and grommets used for the skirt. Time to start working!

Step 13: Putting it together

13

You will want to stitch the two fronts together with probably a 5/8″ seam, that’s just standard. Stitch around both sides and the top. Once sewn, trim the seams and clip the corners and turn it right side out. I always press between each step, but that will be up to you as you work.

Step 14: Cutting

14

In the center, you will want to mark how high up your zipper goes. For this skirt, the customer is longer legged, so I used a 12″ zipper. I usually use a 7″, but compensate for height. Once marked, just cut through both layers to that point. Easy enough!

Step 15: Pinned

15

Once it’s all cut, place the zipper in the cut, I usually cut off the little 5/8″ extra on the tape so that I can just encase the zipper in the hem. You will want to fold over the sides on the zipper tape to hide the raw edges, then fold the hem over one side and then just even it out on the back.

Step 16: Top Stitched

16

This is what it will look like once all the top stitching is done.

Step 17: Buckles

17

I just cut strips a little over twice the size of the inside of the buckle and stitch them together, turn them right sides out, press, and then stitch the buckles in and put in a few grommets to make it easier to close. They are then just stitched down into place where I need them to be on the skirts. Make sure to put the pieces with the buckles on the back of the skirt and the pieces with the grommets on the front.

Step 18: Front and Back

18

Buckles and straps all on and it’s ready to wear! For the easiest wear, sew the front and back pieces to the front and back of the shorts you plan to wear with this costume. It will make it easier in the long run…trust me.

Step 19: Final Product

19

A nice side view of the skirt all completed.

And the entire costume in action:

20

This method can be applied to Sakura’s dress as well as her Shippuden shirt. Here’s a finished version of her sleeveless dress I made a while back.

A little info about me while we are at it since I think I should introduce myself in my first post.

I am a 28 year-old cosplayer who works in retail as a profession, but am a designer at heart. I have been cosplaying for ten years now and have learned a trick or two in the process. I sew for myself, friends, and do commission work, so I’m always making costumes when I’m not working at my real job. Feel free to comment with questions, concerns, or anything else you might have! If you want to ask me something more in depth than comments allow, you can contact me at my email: mehdiaraiise@gmail.com I use that one for anything and everything cosplay related.

Coming soon: Pleating tutorial for Madam Red from Kuroshitsuji and a scarf tutorial for Lavi from D.Gray-Man.

http://images.cosplay.com/photos/25/2539081.jpg

How to Make Avatar the Last Airbender Mai’s Cosplay Weapons?

To make a weapon, wig, costume or any other item for cosplay will greatly enhance your total experience. We keep sharing making tips here, wishing to bring you some helpful inspirations. Today’s theme is the tutorial, about how to make Avatar the Last Airbender Mai’s cosplay weapons. It’s created by the American girl, who is known as REUmbrellaDarkness at Deviantart.com. Liking music, cosplay, anime and video games, she absolutely does well in this performance art. Let’s expect more tutorials from her!

How to Make Avatar the Last Airbender Mai's Cosplay Weapons

How to make Emily the doll – Pandora Hearts Tutorial

No Break Xerxes cosplay is complete without his doll Emily! This tutorial will show you how to make a quick and cheap Emily doll which you can clip onto your clothes to complete the Break look.

Check out my other cosplay accessories at http://mixiao.deviantart.com/

What you need:

  • Foam Ball (my ball was 5-6cm diameter) – this will be the head of our doll.
  • Foam Bell shape – body – since Christmas  is coming up I’m sure you will be able to find a foam bell at craft stores.
  • Blue stretch fabric – has to stretch so our Emily’s Head doesn’t have creases on it.
  • Light pink fabric – not stretch, just regular cheap fabric.
  • Brown wool
  • Red ribbon
  • One sheet of Felt – any colour
  • 2 alligator clips
  • White and pink paint
  • Black fabric marker
  • Polyester stuffing
  • Hot glue
  • A thin wooden stick.

Steps:

  1. Using a pen/pencil/long pointed object, make a hole right though the foam ball. Make sure the hole goes directed though the centre of the ball and it is around 1cm in width. 
  2. Cut out a decent amount of blue stretch fabric enough to cover the whole ball and a little bit more.
  3. Wrap the fabric around the ball, tucking in the excess into the hole we just created. Make sure to not have many creases.
  4. Cut out many stands of the wool for hair, the lengths of the strands do not have to be the same. and tie all the stands together using one of the wool stands.
  5. Fold the hair together at the point where you tied a knot, put hot glue into one of the ends of the ball and place the folded part into the hole,  cut the top hair all the same length. (use a pencil to help push the hair in) should look like this:
  6. Cut out 2 pieces of 20cmx40cm from the pink fabric.  Lay both pieces on top of each other and sew the shorter sides.
  7. Fold in 1cm and iron this down to make a hem. Do this for both pieces but only for one side. The other side, fold in 2cm and iron down.
  8. Now sew the hems, for the 2cm side, leave a small gap, don’t close off the stitching.Thread ribbon through the 2cm hem. Now leave this aside.
  9. Grab your Emily head and wooden stick, put some hot glue into the other end of the head and place the wooden stick into the hole.
  10. Make a hole in your foam bell, pour hot glue into the hole and place the wooden stick with the head into the hole. Make sure the head sits nicely ontop of the bell. The stick does not have to be long as the bell, it can be shorter.
  11. Put hot glue onto the bottom of the foam bell and then place it on a sheet of felt. Cut off the excess.
  12. Cut out 4 15cmx4cm rectangles from the blue fabric. Place 2 pieces on top of each other and sew around(curve the ends for arms) and repeat for other arm. Stuff the arms with the toy stuffing and sew the ends off.
  13. Hot glue the 2 arms on the foam bell right under Emily’s head.
  14. Now for the bow. cut out a 10cmx8cm  rectangle, fold this in half (fold the 8cm side in half)and sew around, leaving a small gap, turn the rectangle inside out and iron it out. Cut out a 20cmx8cm rectangle, fold in half and sew it the same way. Cut out a small strip of the pink fabric 3cmx 4cm, hem the sides, fold this in half and sew the side opposite to the fold.[Image for steps below]
  15. Turn this inside out, and put the 2 pink strips you just sewed though it then thread though the back of the bow with some ribbon.
  16. NOW! here’s where it all comes together, Grab your bow, tied it around Emily’s neck and tie 2 knots at the back. Cut off excess ribbon. Place the pink “”skirt/dress” we made in step 8 over the ribbon knot but under the bow. Pull the dress’s ribbons together like a drawstring. Securely tie a knot, and cut off excess ribbon.
  17. Paint on 2 white circles for eyes, a pink creepy smile wait to dry and trace over the edges of these shape with your black fabric marker.
  18. Grab some of the red ribbon scraps, tie a bow on the top of Emily’s hair.
  19. Turn Emily upside down and hot glue the 2 alligator clips of opposite sides of the bell.

And we are done! There are lots of steps but it doesn’t take that long at all. I hope you enjoyed the tutorial!

Cosplayer Interview – MichikoKojima

Tohru Cosplay

American girl, MichikoKojima, whose Adventure Time Fionna cosplay hat making tutorials was found by us yesterday, accepts our interview today. Actually, I do love many cosplay works created by her. All of them can be seen in her Deviantart gallery. Except stunning cosplay pictures, her cosplay tutorials do help most cosplay fans. Now, focus on this interview, to know more about MichikoKojima.

1. Please introduce yourself first.

My name is Alisha Klein. I am 21 Years old and my cosplay name is Michiko Kojima or just Michiko for short.

2. What does cosplay mean to you?

Cosplay is a way of expressing myself. In my normal daily life I can’t always act like the silly goofy person that I am. Cosplay is the ultimate way for me to be who ever and whatever I want regardless of age, gender and skin color.

Bluebell Cosplay

3. What and when was your first cosplay?

My first Cosplay was Kagamine Rin from Vocaloid. I wore that costume to my first ever convention (Anime Detour) in 2009.

4. What is your most memorable cosplay experience?

My first photo shoot at Anime Detour 2009. I was sooo nervous but I was still able to make some new friends and enjoy myself. It was a large group of vocaloid cosplayers. They were all so inviting and friendly to me and my friends. I will never forget all the laughs and silly poses.

5. What’s your favorite photo shoot?

I finally was able to get my cosplay group to do a photo shoot this past summer. We were in our Eeveelution cosplays. The costumes were very quickly thrown together not much time was put in but the photos that I got were still amazing in their own way. Photo shoots with your friends are always the best ones.

haruhi suzumiya cosplay

6. What’s your favorite anime/manga/game character to cosplay as?

For along time now I’ve loved cosplaying Tohru Honda from Fruits Basket. I didn’t make the costume myself but I still felt so comfortable in the costume and as the character. There is something so sweet and simple about the character that I enjoy.

7. Any cosplay plan in future?

I have a long list of costumes that I would love to make, but currently I’m working on Fionna The Human from Adventure Time and Serah Farron from Final Fantasy 13.

8. Do you make your costumes yourself or buy them?

I have purchased many costumes but I am now working on making them myself. Sewing is a lot of work but at the same time when you finish a costume and put it on for the first time you feel so good about what you’ve created.

K-ON Tsumugi Cosplay

9. Any other cosplayers you like?

I look up to a lot of other cosplayers I truly don’t like to pick and choose between them though. especially when my list of awesome cosplayers keeps growing every day. I know this means I’m avoiding the question but I honestly find something great in every cosplayer I see.

10. Do some changes happen to you after cosplay?

I wish I could understand this question better. I guess you could say that I find I’m happier after I cosplay. I feel like I’ve done something that I myself am proud of. I cosplay for myself and for my own enjoyment so I always feel good about my work even if I made some mistakes.

11. Any advice you wanna share with cosplay newbies?

I myself am still a cosplay newbie, so to all those other newbies out there just have fun! Don’t cosplay to be cool or well known. Do it because you love it! It doesn’t matter if you make the costume yourself or if you buy it. If your having fun that’s all that matters!